The Conversation (0)

Rachio Review: Best Connected Sprinkler Controller For Your Smart Home
New Connected Sprinkler Controllers Can Help You Save Money And Make Your Smart Home Look Good.
Last updated: March 20, 2018.
As we start the summer season, and begin focusing on our home's exterior and yard, GearBrain wants to ensure you have a good understanding of connected devices for your grounds. The first device that comes to our mind? A connected sprinkler controller—a device that hooks up to your existing sprinkler system, or can be added to any new system you plan to install this season. After researching this category, and armed with a review copy, we decided to put Rachio to the test. Our take? That this is one of the best connected sprinkler controllers on the market today.
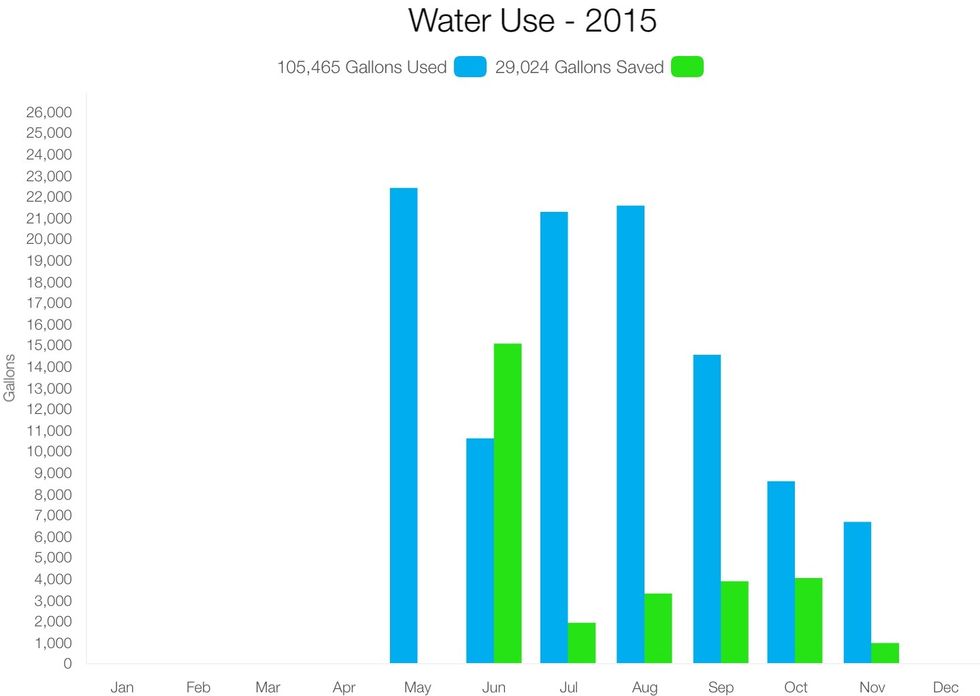
So why would you want a connected sprinkler controller? One of the main reasons a home owner would install this device is to help save money on your water bill. In some cases, this tool can save you considerably, while also making your home look good. A friend of mine, Eric, installed a Rachio controller in his house a year ago, saving over 29,000 gallons of water. Your savings may vary depending on what you pay for water. (The national average is $1.50 per 1,000 gallons per American Water Works Association.) This was a nice savings, though, for my friend. (Want more ways to save money on your smart home? Checkout GearBrain's article about smart energy tips.)
Another reason to install a connected sprinkler controller is to help the environment. The Environmental Protection Agency (EPA) has a voluntary certification program designed to help protect the nation's water supply. It's called EPA WaterSense Certification, and has a selection of water efficient products, including Rachio, which is something you should look for in any connected sprinkler controller.
The setup
Before tackling the set up process, you should know that all connected sprinkler controllers will say they take 30 minutes to install, or that their devices are easy to put together. I would say they are half right. If your current system is complicated (i.e. multiple zones and controllers), and you are not comfortable working with wiring, you will spend more than 30 minutes to set Rachio. I have six zones, plus two controllers, and I spent about two hours from start to finish. I found the process similar to installing a light fixture. If you think that sounds easy, then you will find the set up process for Rachio easy. If not, you can still set this device up but it will take you longer.
For your first part of the setup process, you'll need to take a picture of the wiring in your current sprinkler controller. This is one of the most important steps in the installation process for all connected sprinkler controllers. Make sure you take a clear picture and then label each wire. This will make it easier for you when you later connect the wires to the correct slots in the Rachio controller. Below is a picture of my set up, which looked simple, but had hidden issues I dealt with in the next step.
For the next step, make sure to place your connected sprinkler controller next to an outlet, and that there is good internet connectivity. This is a connected device—you'll need a connection to the Internet or Rachio will not work properly. Want to install the controller outside? That's fine. Rachio has a water proof box—just make sure you have an outlet where the controller can be plugged.
Once you've taken your pictures, disconnected the wires and unmounted your old controller box, it's now time to mount Rachio's controller. I installed Rachio in the same place as my old connected sprinkler controller, which made this part easy for me.

Now comes the hard part, at least for me since I am not good with wiring or electric. You need to line up your wiring to the correct number ports. (See image below.) You will see on the Rachio controller there are enough slots for up to 16 zones, which is pretty impressive. For my set up, I have only six zones, but I have two controllers. I connected each of my zones to the corresponding slot in the controller box, then I inserted my controller wiring into each of the "C" labeled slots. Next, since I have a master pump/valve set up, I connected my "M" labeled wire to the "M" slot in the controller. Once I had all the wiring in place, I connected the power cord and started to download the app.
Once the app is downloaded, the app will walk you through the setup of your zones. This was very easy except I ran into a minor problem. At first, I found half of my zones didn't work. Despite looking at everything, they wouldn't turn on for me. I decided to call Rachio's customer service. They provide an 800 number and the hours for customer service are seven days a week (8am to 7pm MST) during the summer months of April to September, and then Monday through Saturday (9am to 6pm MST) in the winter months of October to March. They are closed on Thanksgiving, Christmas and New Years.
After waiting just two minutes, Matthew from Rachio came on the line. Very pleasant, he asked a few questions about my setup, then requested I send him the pictures of the wiring in my original box and of my current Rachio box. After a few seconds of reviewing, he asked if I had turned on the master pump/valve in the app. This is a step in the instructions I missed. He walked me through turning this part on but the zones would not work. After looking more closely at my wiring photos of the Rachio box, Matthew was able to see I had two wires in the same slot. We corrected it, and the zones started working properly. I had a pleasant experience speaking to Matthew and recommend calling customer service if you run into any problems during the installation process.
Now that I had each zone working properly, i was time to set up each zone's profile. Again, this step was simple as Rachio's app walked me through each step. You'll select the type of vegetation (grass, shrubs, trees, etc.), soil type, sun exposure, nozzle and the slope of your property. Note: Rachio has a very detailed "help" section on the app. It's clearly labeled with a question mark and is very useful when trying to figure out the vegetation and other details on your ground. Also helpful? The tutorial videos in Rachio's Support section. Once you complete profiling your zones, make sure you disable all the remaining zones you don't use. That step will make it easier for you to control your zones later on the app.
The last step is the easiest of the setup process: setting your watering schedule. In the app you need to select 'Edit Watering Schedule.' The app will then walk you through each zone and ask to select scheduled type, the time of day to start, and your start date. I selected 'As Needed' which is recommended. Next, the app will show you two smart features which they suggest you use to save money on water: smart cycle and weather intelligence. Rachio defaults to these two features. If you don't want to use them, turn them off. I would recommend keeping them on as they are two of the key features you expect when using a connected sprinkler controller.
When done, your set up is complete and you are ready to go. Here is what the setup for your year will look like on the app home screen:
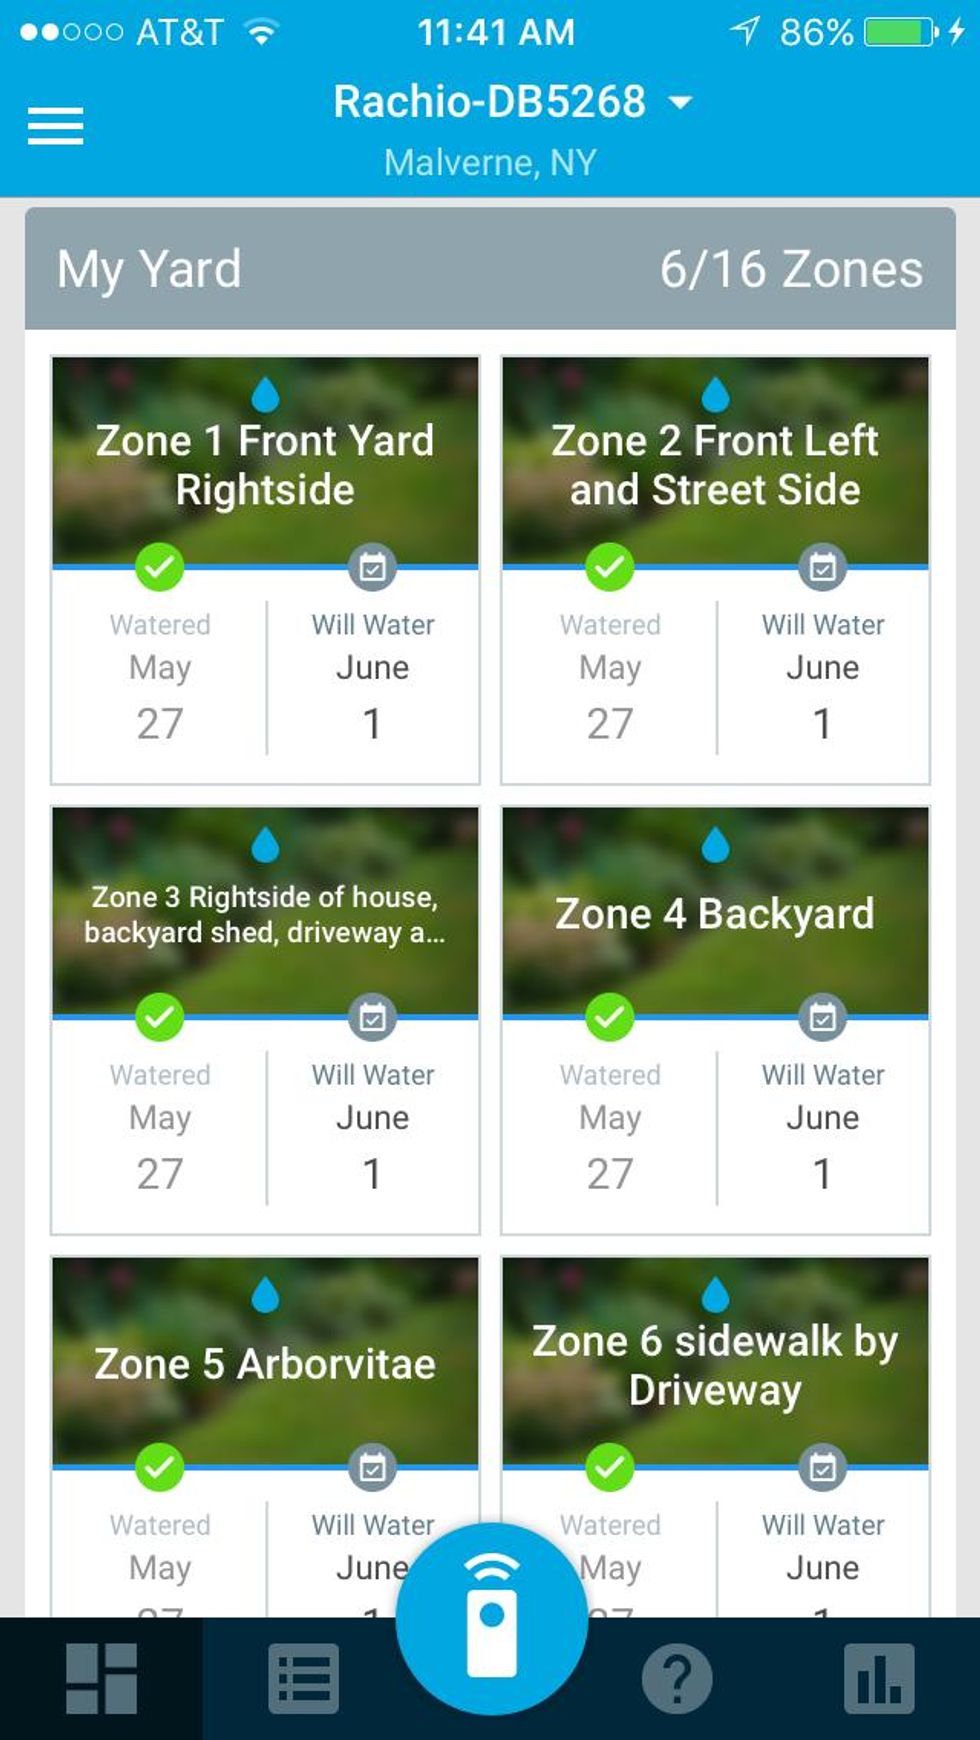
After about two hours, my setup was complete, with all my zones working. Now it's time to let Rachio do what it's suppose to do: give me a beautiful lawn plus healthy shrubs, conserve water and save me money.
You can control Rachio by its app or another smart home controller, like Amazon Echo. Rachio says its system works with Amazon Echo, Wink, Nexia, SmartThing, Nest and a few others. And just recently, Rachio now works with Google Home and Samsung SmartThings connected hub. My friend Eric connects his Rachio to his Nest Thermostat, saying his connection process was simple as well. Before connecting your Rachio to another smart home hub, GearBrain recommends to check that the hub is compatible with Rachio. As we have reported before, there are five different wireless protocols and you need to make sure all your devices are on the same page. (To learn more about these five different wireless protocols, check out our article, From B to Z: How Your Smart Home Speaks Wireless)
A few notes
Overall, the set up process was not as overwhelming as one might think, with both the videos and customer service very helpful. Two things I would like to see are a better call-out of the master pump/valve, along with a solution that picks the right nozzle setup if you have multiple nozzles in one zone, as I did. Rachio says they are working on this since these choices impact how much water you use in a zone.
In the end, we found Rachio to be the best connected sprinkler controller on the market for home owners today. The connected device is easily integrated into your smart home setup, helping you save money, as well as making a solid impact on the environment. If you have a sprinkler system, or are consider installing one, this is one IoT device we think all smart homes should consider.
Note: Rachio launched 2 new products and you can find out more about these new products by visiting GearBrain's Rachio smart sprinkler launches two new products to keep your lawn green and water bills down.
If you need help installing Rachio or any other connected sprinkler head, you can visit HomeAdvisor.com to find a local trusted professional. And don't forget to check out The GearBrain: What works with Amazon Alexa to see what other connected devices work with Amazon Alexa besides Rachio.
Pros: good customer service, saves money, EPA Certified, integrates with other connected devices
Cons: Not as easy to install as you think, takes time to arrange correct water settings, nozzle configurations
GearBrain Compatibility Find Engine
A pioneering recommendation platform where you can research,
discover, buy, and learn how to connect and optimize smart devices.
Join our community! Ask and answer questions about smart devices and save yours in My Gear.