The Conversation (0)
GearBrain
Google Nest Cam with Floodlight (Wired) Review: Home Security Made Easy
Discover the features, installation process, and smart home integrations of Google's latest outdoor security solution
If there is ever an outdoor smart device associated with home security, it's a floodlight camera or, as many call it, a "floodlight cam." And why is that? It's because a smart floodlight camera can bolster one's home security with features like motion sensors and HD video recording, deterring intruders and providing real-time alerts. It also comes with the ability to monitor a property remotely via smartphone apps and integrate with existing smart home systems, adding convenience and accessibility. Many floodlight cams have customizable settings that allow for tailored adjustments, ensuring optimal performance. Ultimately, these devices offer peace of mind by continuously monitoring, deterring potential threats, and illuminating dark areas for enhanced safety. And we recently tested one by Google Nest. Check out what we found while trying the Google Nest Cam with Floodlight.
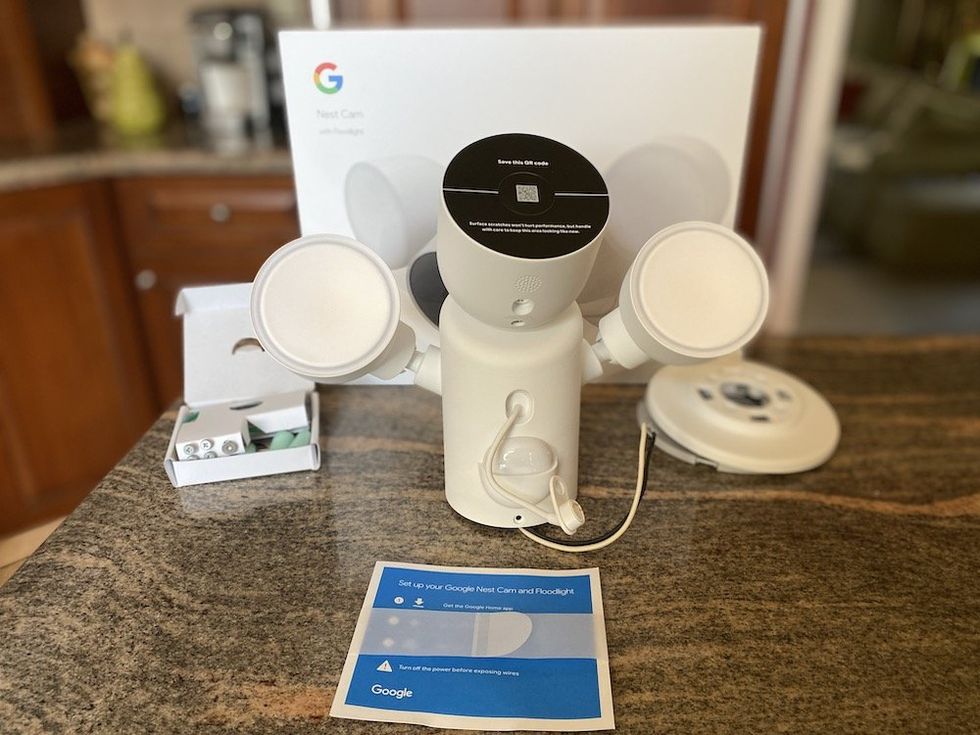 Google Nest Cam with Floodlight (Wired) unboxed.GearBrain
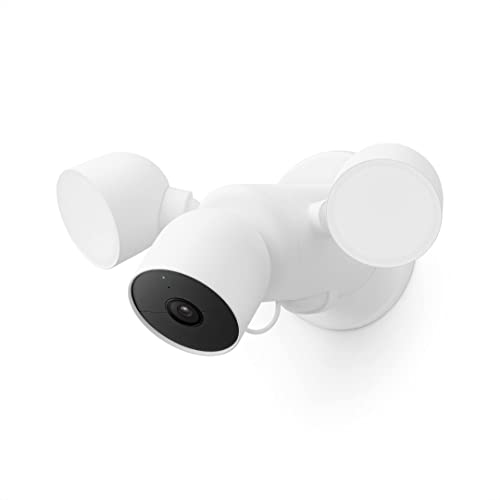
The Google Nest Cam with Floodlight is a cutting-edge outdoor security camera designed to enhance the safety and security of your home. Combining intelligent surveillance technology with powerful lighting, this device is crafted to deter unwelcome visitors and provide peace of mind. Below are the key features of the Google Nest Floodlight Cam:
The Google Nest Floodlight Cam is not just a security device; it's a comprehensive home safety solution that blends innovation with functionality, offering illumination and surveillance to keep your home safe and secure.
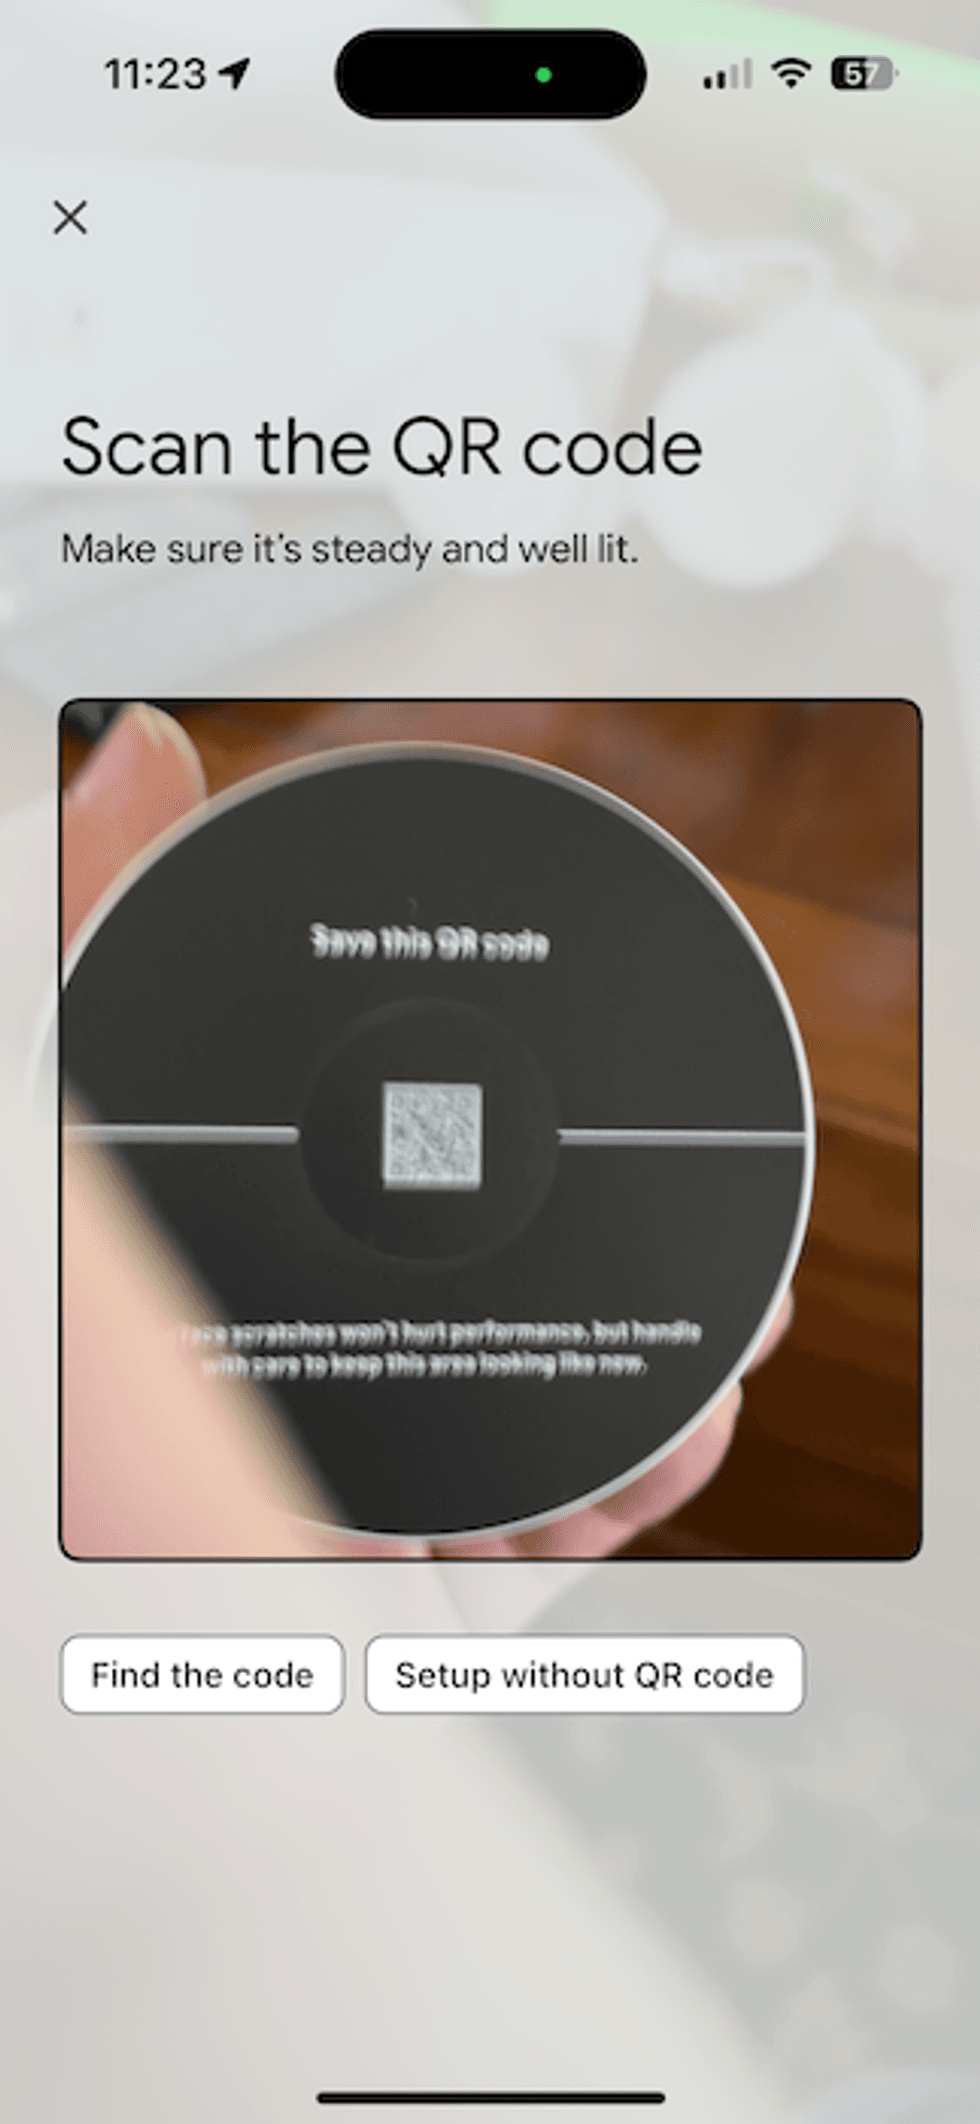 You will need to scan the QR code on the Nest Cam to get to the installation directions in the Google Home app.GearBrain
You can install the Google Nest Cam with Floodlight in two ways. You can hire a professional to install it or do it yourself. This floodlight cam can be rather tricky to install since it needs to be installed outside your home with a good Wi-Fi connection and requires power. Remember, the power needed is 120 volts, so if you are not replacing an existing outdoor light, you will need to run a power line that requires a pro to install. Also, ensure the place is high enough on the side of your home to get a good view of the area you want to monitor. So that means getting up on a ladder. If you are comfortable working with electrical wires and not afraid of heights, then go ahead and install it yourself. But, if not, you can hire a local professional to help you install it. (Read our
For those of you going the DIY route, installing a Google Nest Cam with Floodlight is not complicated, but it involves several steps to ensure it's set up correctly and securely. Below, we've outlined the steps to help you install the Nest Cam with Floodlight. Make sure you have all the necessary tools and have chosen a suitable location for your floodlight cam before starting the installation.
Here's a step-by-step guide:
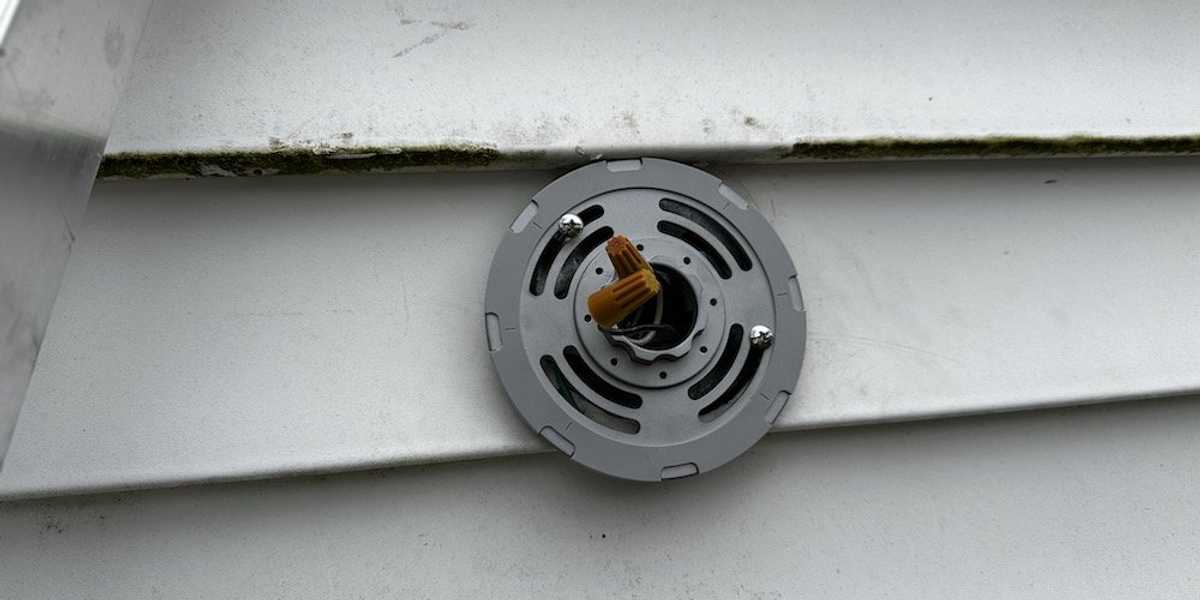 First mount the mounting bracket for Google Nest Cam with Floodlight (Wired)GearBrain
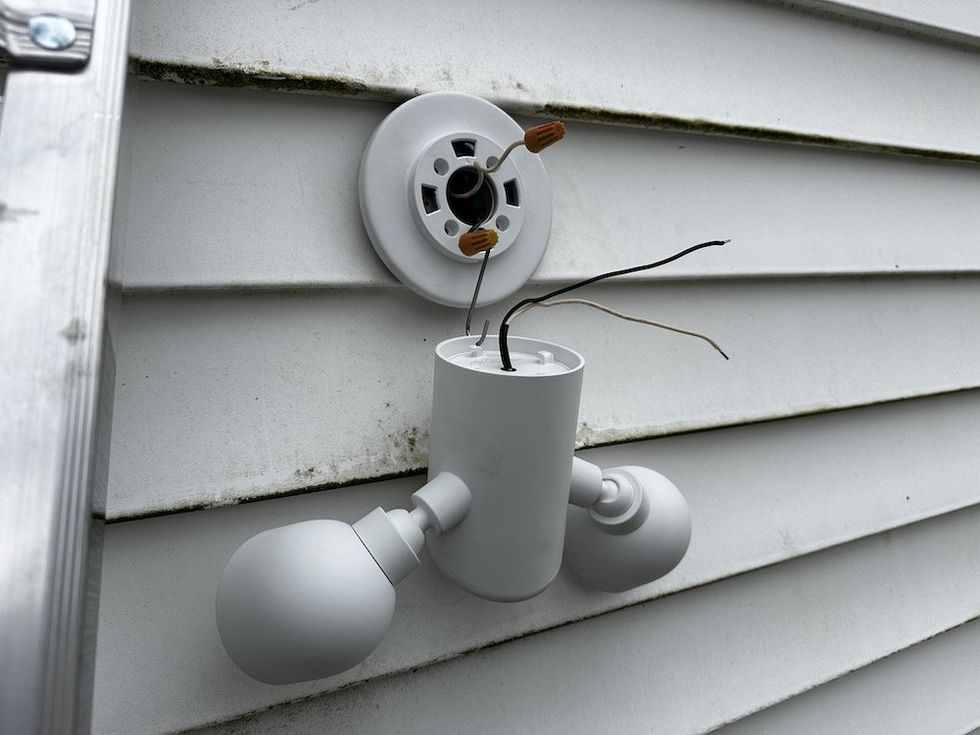 Use the S hook to hold the Google Nest Cam with Floodlight while you attach the wires.
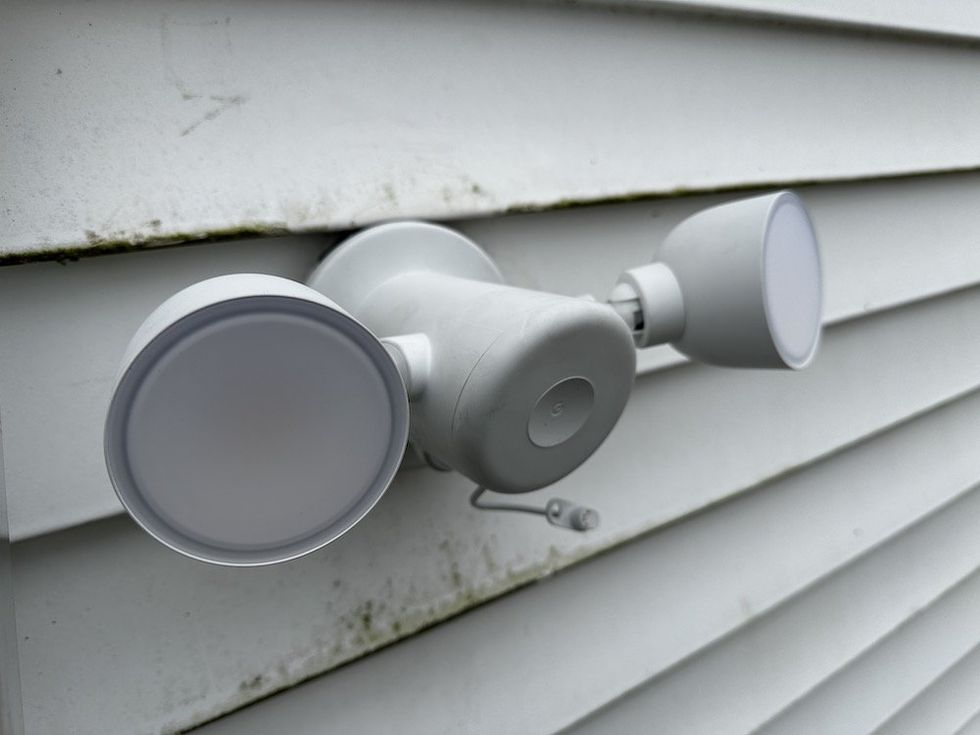 Snap on the Google Nest Cam with Floodlight (Wired) to the mounting bracketGearBrain
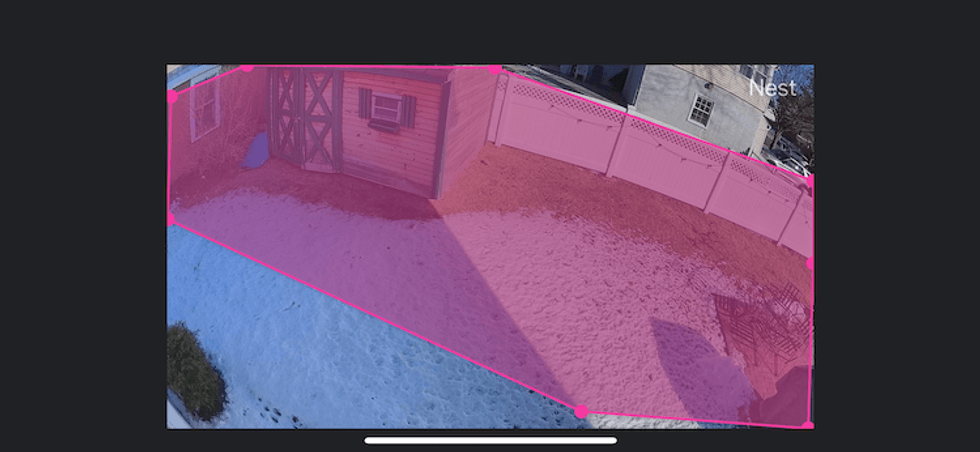 User Google Home app to set customized motion zones for Google Nest Cam with Floodlight (Wired)GearBrain
Following these steps, you should have your Google Nest Cam with Floodlight installed and functioning to enhance your home's security and outdoor lighting.
Here are a few tips we learned while testing the Google Nest Cam with Floodlight:
As mentioned above, the Google Nest Cam with Floodlight works with the Google Assistant voice platform, which has a large ecosystem of smart home devices and systems it can control. For instance, Google's security system, Google Nest Secure, works with the Nest floodlight to provide centralized control and monitoring of Google Nest security devices within the home. The floodlight cam works with compatible Google Assistant-enabled devices, enabling voice control and integration with other smart home products and systems, such as Nest thermostats, smoke detectors, and doorbells, for comprehensive home automation and security.
But the Google Nest Cam with floodlight also works seamlessly with other various smart home security systems, like ADT and Abode smart home security systems. If you are tech-savvy and know how to work If This Than That (IFTTT), you can create applets to integrate your Nest floodlight cam with other smart devices. And for Apple HomeKit users, you can get creative, get a Homebridge plugin, and connect your Nest floodlight cam to Apple products like iPhone, iPad, and Mac to control your floodlight cam and set up automations with other Apple HomeKit compatible devices. Note that this is not easy to do, but it works.
Lastly, if you are a Samsung SmartThings user or have a Samsung smart TV with SmartThings, you can access your Nest floodlight cam from either the Google Assistant app if it is built-in to the TV or the SmartThings app. Google Nest cameras, video doorbells, and smart thermostats work with Samsung SmartThings. Users can enable integration with a wide range of smart home devices and create custom automation routines for enhanced security and convenience with Samsung SmartThings and Google Nest devices.
The Google Nest Cam with Floodlight lists for $279.99 and is available only in Snow (white). You can pick one up on Google Store, Amazon, Best Buy, The Home Depot, and other major online retailers that sell smart home devices.
Is this a reasonable price? When we look at the market of smart home floodlight cameras, we notice the prices range from as low as $75 to as high as $300. We have found the camera's features, build quality, brand reputation, and how it compares to similar products in the market drive the price. On the low end, you have floodlight cams from Eufy, Blink, Wyze, and Geeni selling for less than $100, while devices by Lorex, Arlo, Swann, and Reolink are under $200. At the top of the market is Ring Floodlight Camera Plus, as well as newer models from Lorex, Netatmo, and Amcrest. Based on the features of the floodlight cameras, the Google Nest Cam with Floodlight is priced on the high side of the market. What drives the price for the Nest floodlight cam is its advanced features, including intelligent motion detection, HD video, and vast smart home integrations, including ADT, Samsung SmartThings, and Abode Smart Home Security System. You must decide if the Nest Cam with Floodlight features meets your outdoor security needs.
After testing the Nest floodlight cam for several weeks, we found it to be a reliable outdoor security device. The video quality is excellent, the motion detection works very well, and the setup is relatively easy if you replace your existing outdoor light with the Nest Floodlight Cam. The sound coming out of the floodlight cam when talking with someone is average, but the sound you hear in the app is excellent. It's very sensitive and hears a lot. During our testing, we could hear the wind. You can turn the mic off in the app settings, but it will disable live audio recording, too. You can adjust the camera volume, but it's for your voice being broadcasted from the floodlight cam and not in the app.
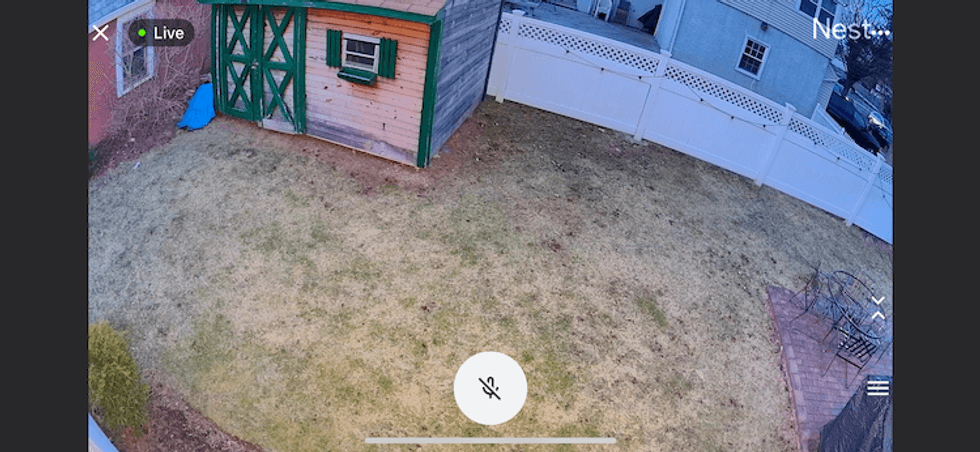 Google Nest Cam with Floodlight (Wired) comes with excellent daytime and night time video quality.GearBrain
One feature we did like with Google Nest cameras is the familiar face detection. This is Google's facial recognition. This helps you differentiate between friends and unwanted guests. In the Google Home app, you will see Seen Events under Events. This is where you will activate the Familiar Faces features. This feature will store the faces of the people you don't want alerts. We recommend activating this feature, especially if you have kids playing in the yard or are out in the yard a lot and in view of the floodlight cam.
Another feature you should activate is the Motion Detection. It can be found in the Google Home app under Notifications. Here, you can set your motion detection and activity zones. Google Nest cameras have excellent motion detection and are easy to set up.
The best part of the Google Nest Cam with Floodlight is its compatibility with other smart devices and security systems. If you have either an ADT or an Abode security system, you can use this floodlight cam. It can integrate with these smart home security systems nicely. This is a nice integration to have today. We also like how the Nest floodlight cam can be integrated into your own DIY system if you are using Samsung SmartThings, IFTTT, and the Homebridge plugin (Apple HomeKit). Granted, these types of integrations do require some technical skills, but they are possible and not often found with other smart floodlight cams.
What we did find to be challenging with the Google Nest Floodlight Cam was the settings for the floodlights. This section is not as advanced as seen on a smart light app. You can use only three features: What turns on the floodlight, a timer, and a daylight sensor. The "What turns on the floodlight" setting is where you will select turn on the floodlight when motion is detected and the motion sensor's sensitivity. You can also activate a setting to turn the floodlight on when someone views the live video in the Google Home app. You can select the time you want your floodlight to stay on after detecting motion—all fundamental features. We were surprised there was no setting to turn your floodlight on and off or have your floodlight go on at sunset and off at sunrise. There wasn't even a setting to have the floodlight go on each day or specific days between pre-determined periods. Something to be aware of if looking for a floodlight cam that can also be used as an outdoor floodlight.
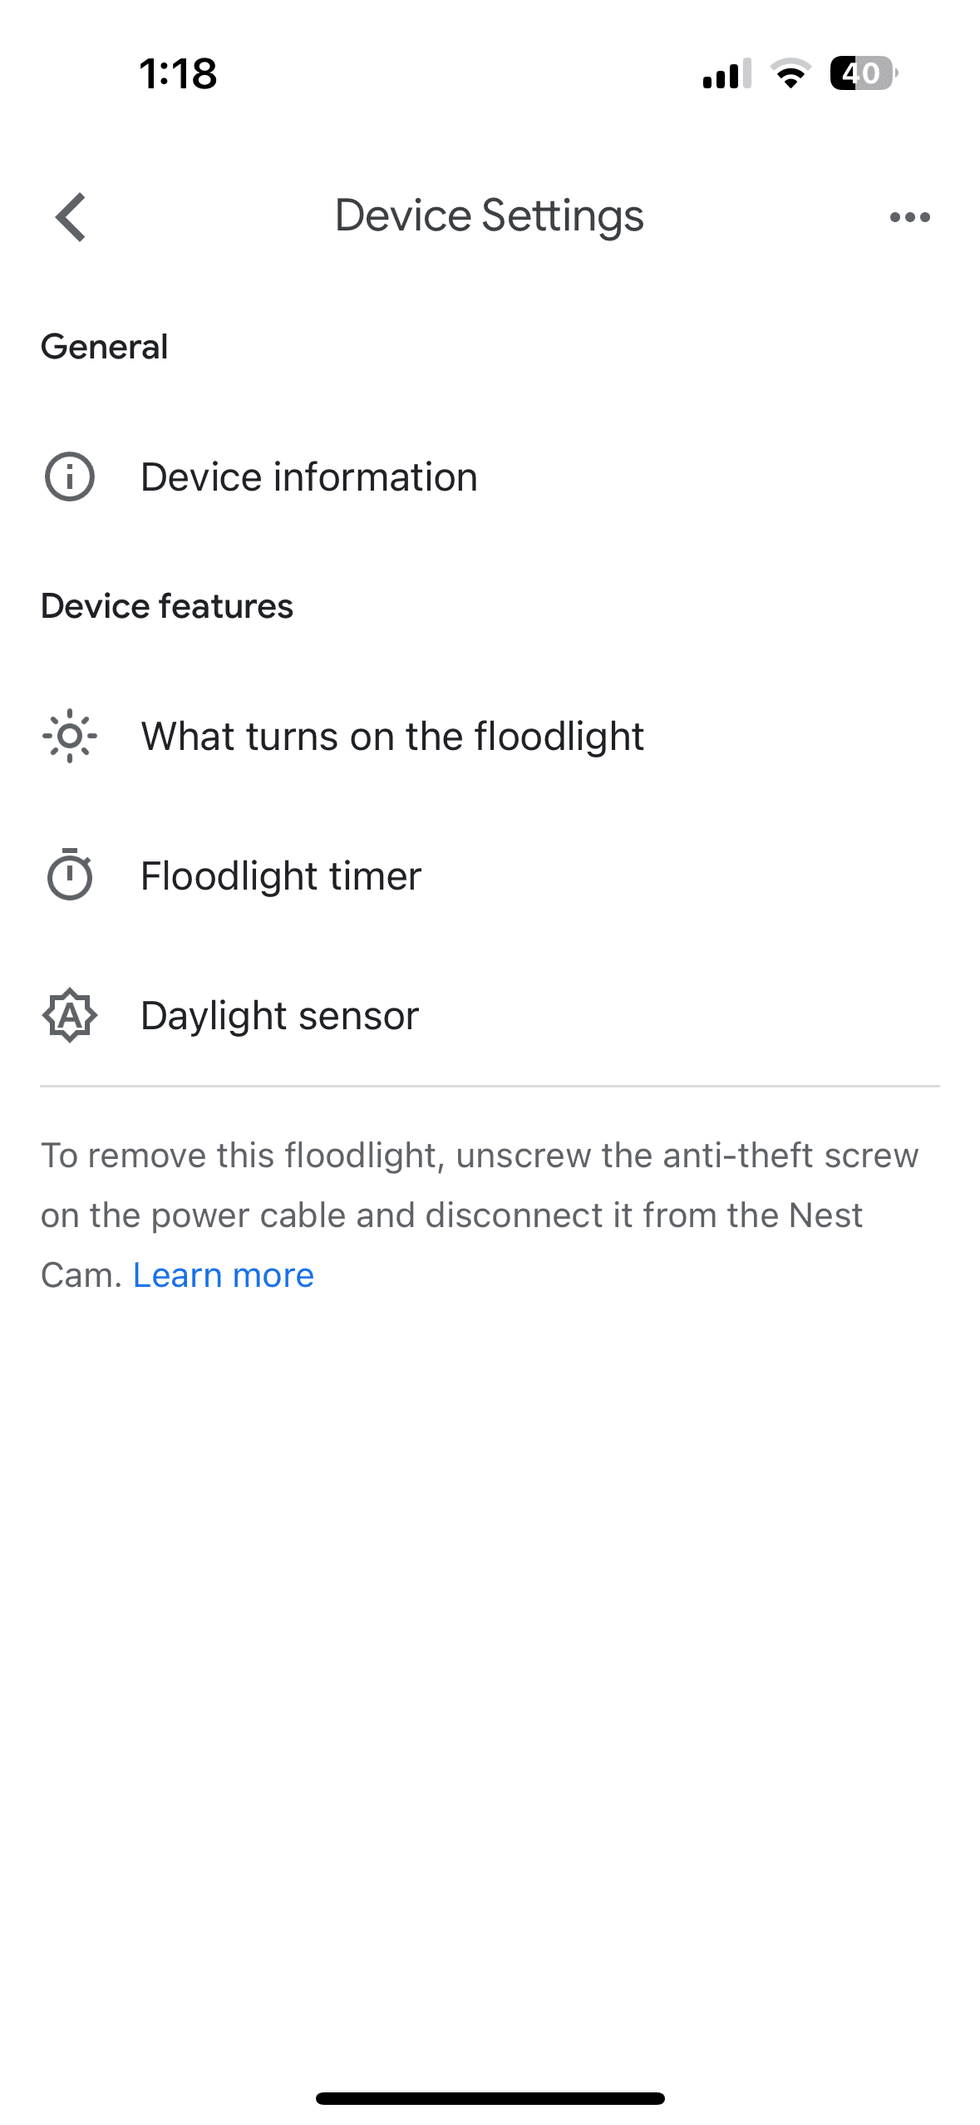 Google Nest Cam with Floodlight (Wired) comes wiith limited lighting controls.GearBrain
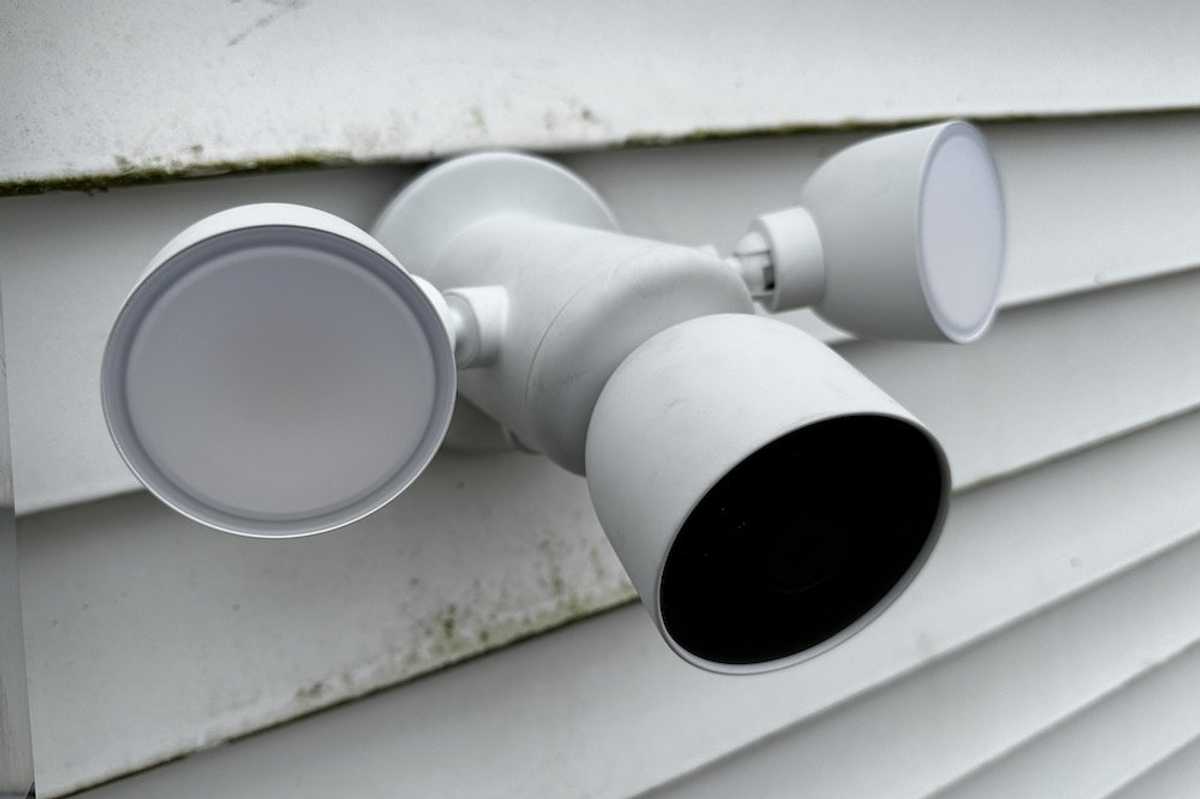
We were a little surprised with the low FOV. At 130 degrees, this is rather low compare to other floodligh cams. For instance, Ring Floodlight Cam has a 140 degrees FOV, Eufy's floodlight cam has 140 degrees FOV, and Arlo Pro 3 Wireless Floodlight Camera has 160 degrees FOV. And these floodlight cams cost about the same as the Nest floodlight cam. So, if you have a large area outside that you want the floodlight cam to monitor, you will most likely need to position the Nest floodlight cam higher than the recommended 9 feet on your home.
Lastly, with any security camera, you need to understand your options on where to store your videos from the camera. A majority of security cameras offer plans to store your videos in the cloud, while other cameras offer local storage via a microSD card. And some offer free cloud storage for a specific amount of time. The Google Nest Cam with Floodlight will store a rolling 3-hour lookback of videos for free. It does provide a 30 free trial for Nest Aware, which is their paid service to store your videos. They have two monthly subscription plans that start at $8 per month, Nest Aware and Nest Aware Plus. The Nest Aware plan provides a 30-day video history and intelligent alerts like familiar faces and costs $8 per month or $80 a year. The nest Aware Plus plan provides all the features in the standard Nest Aware plan but 60 days of video storage, up to 10 days of 24/7 video history, and costs $15 per month or $150 per year. Though these plans might sound costly, keep in mind the video history is for all of your Google Nest security cameras and video doorbells. So, take advantage of the free trial to see if you need to get a plan to store your videos.
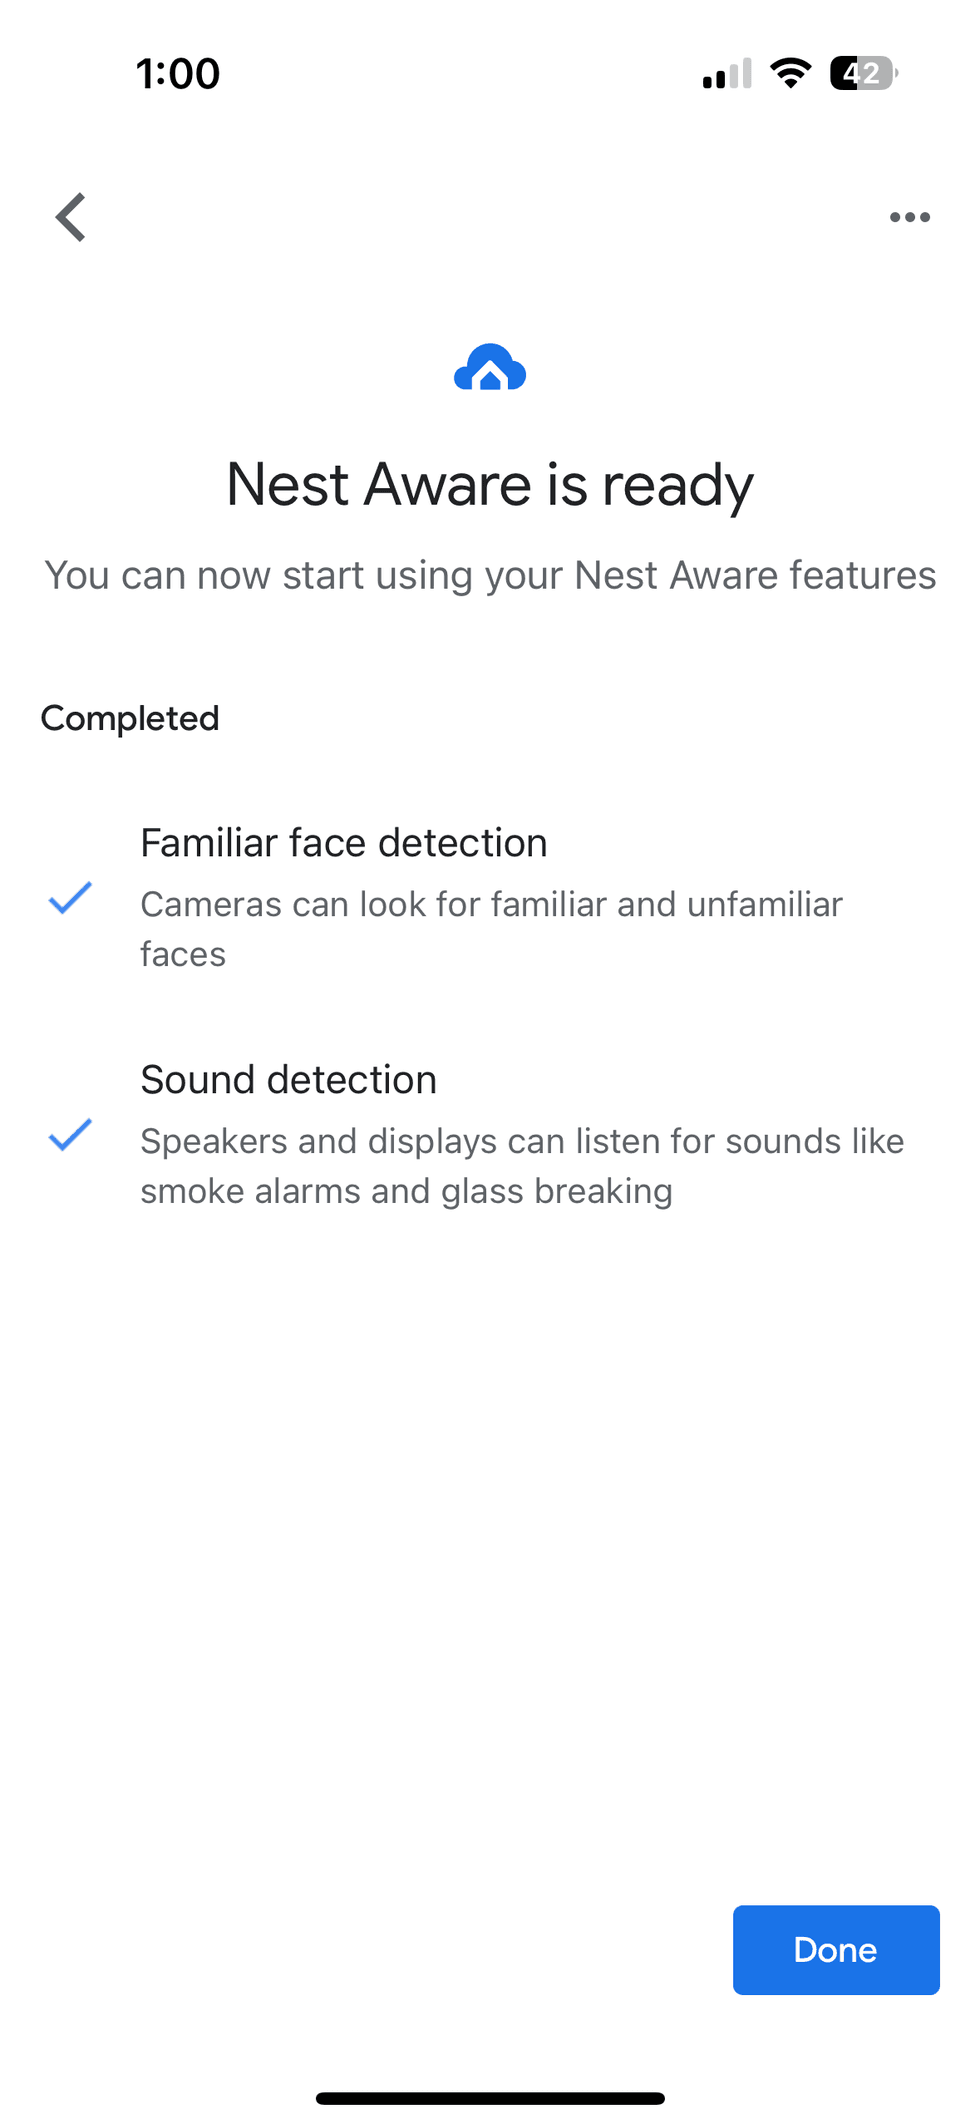 Google Nest Cam with Floodlight (Wired) comes wiith a free 30 day trial of Nest AwareGearBrain
The Google Nest Cam with Floodlight is a reliable and feature-rich outdoor smart home security solution. Though the price is a little high, the FOV is not as big as other floodlight cams, and it has limited floodlight controls; it does come with several good features that you need in a smart floodlight cam. It has reliable motion detection, which can be customized for your home. It has excellent 1080p HDR video resolution, night vision up to 20 feet in the dark, facial recognition, and is compatible with major smart home security systems and the Google Assistant ecosystem.
So, who should buy this floodlight cam? The Google Nest Cam with Floodlight is perfect for any ADT or Abode smart home security system customer. This floodlight cam would be a great addition to our smart home. It would also be a good device for any smart homes that use Google Assistant or Samsung SmartThings as their smart home platform and want to add a new outdoor wired security camera or floodlight cam. The Nest floodlight cam could be a good addition to any Apple HomeKit users who are capable of using the Homebridge plugin to add a new floodlight cam to their HomeKit platform.
Overall, the Nest floodlight cam offers a comprehensive, reliable, and feature-rich solution for enhancing your smart home security system. We think it's a worthwhile investment for those prioritizing safety and peace of mind no matter the smart home ecosystem they use to run their home and keep everyone safe and sound.
Pros
Cons
Check out The GearBrain, our smart home compatibility find engine. It can help you find, buy, and connect any smart device. It can even help you find other smart devices or systems that are compatible with your existing smart devices, such as Google Assistant and Amazon Alexa-enabled devices.
GearBrain Compatibility Find Engine
A pioneering recommendation platform where you can research,
discover, buy, and learn how to connect and optimize smart devices.
Join our community! Ask and answer questions about smart devices and save yours in My Gear.